PrescribeIT Tab (Message Manager) Overview
The PrescribeIT® tab, also known as the Message Manager, is the primary inbox for all transactions (i.e. messages that go back and forth between the prescriber and the pharmacy).
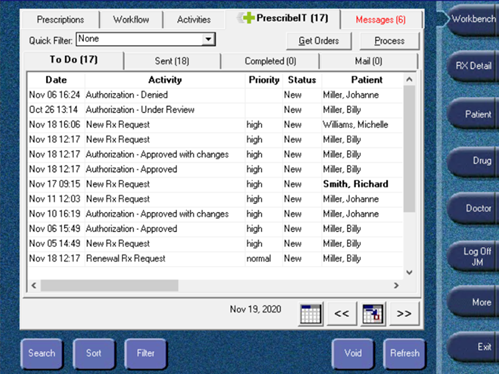
The PrescribeIT® tab contains three main tabs:
The To Do tab contains all incoming messages (i.e. new or renewal prescription orders) from prescribers. Types of messages you will see in the To Do tab include:
- New Rx Order
- Renewal Request Order
- Renewal Response - Denied
- Renewal Response - Approved with Changes
- Renewal Response - Approved
- Renewal Response - Under Review
- Deferred Request
- Cancel Rx Request
By default, all transactions identified as high priority display at the top. You can use the Sort and Filter options (same functionality as existing Prescription Workbench) to sort and filter through transactions. To learn more, see Adding or Removing Prescription Filters.
The Sent tab contains all messages that are initiated by the pharmacy and sent to the prescriber. Types of messages you will see in the Sent tab include:
- Dispense Notification
- Dispense Cancel Notification
- Cancel Rx Request - Denied
- Cancel Rx Request - Approved
- Cancel Rx Request - Remaining Fills Revoked
- Rx Renewal Create Request (Authorization Request)
Note: Sent messages will be displayed for the current day only.
The Completed tab displays non-prescription activities completed for the current day.
Note: The existing Completed tab on the Prescription Workbench will continue to display dispensed prescriptions.
Each new calendar day, the items will refresh. Any New or Renewal transaction that have been “Void” or “Cancelled” will be visible in the Completed tab, as well as completed Cancel Rx Request transactions.
Transaction Types
There are two types of transactions that are managed from the Message Manager: Incoming and Outgoing.
- New Prescription and Renewal Orders: New e-prescription and renewal of a previous dispensed prescription/e-prescription sent from a prescriber.
- Deferred Request: An e-prescription (New or Renewal) for a patient that was unsure what pharmacy they were going to have the prescription dispensed at. The authoritative paper prescription will contain PrescribeIT® ID that will allow the pharmacy to download the electronic information for ease of entry. The authoritative paper copy needs to be scanned and attached to the prescription.
- Authorization Request Responses:
- Renewal Response – Approved and Approves with Changes: When the prescriber accepts the authorization request from the pharmacy to renew a prescription.
Renewal Response - Under Review and Denied: When the prescriber indicates they are not approving the authorization request from the pharmacy to renew a prescription.
- Cancel Prescriptions Requests: When a prescriber needs to cancel a new or renewal prescription that was sent to the pharmacy.
- Dispense Prescription Notifications: A message sent to the prescriber to identify the prescription has been dispensed to the patient.
- Authorization Requests:
- Rx Renewal Create Request: A pharmacy's “Authorization Request” to the prescriber.
- Cancel Prescription Notifications:
- Cancel Rx Request – Denied: The pharmacy has denied the prescriber’s request to cancel a prescription.
Cancel Rx Request – Approved: The pharmacy has approved the prescriber's request to cancel a prescription.
Cancel Rx Request - Remaining Fills Revoked: The pharmacy has revoked remaining fills for a prescriber's request to cancel a prescription.
Message Manager Action Buttons
The following action buttons are available in the PrescribeIT® tab.

Selecting the Search button opens the PrescribeIT® Deferred Rx Search window.
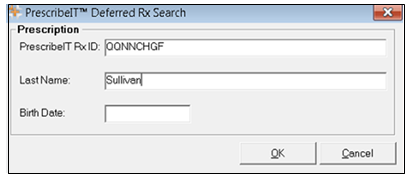
In this search window, users can search for deferred prescriptions (i.e. prescriptions not assigned to a particular pharmacy, as the patient was unsure of which pharmacy they want the prescription dispensed at) by scanning the barcode or entering the barcode number on the prescription's Authoritative Copy, along with either the patient's last name or date of birth. To learn more, see Filling a Deferred PrescribeIT® Prescription.

Selecting the Sort button opens the Custom Sort window.
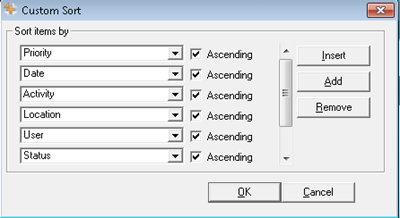
In this window, users can sort columns in the PrescribeIT® tab to organize and view transactions. Use the Add/Remove buttons to add sort criteria and choose if it should sort by ascending order.
You can sort by the following options:
- Activity
- Date
- Doctor
- Location
- Patient
- Priority
- User
- Status

Selecting the Filter button opens the Filter window.
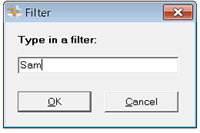
You can filter items in the PrescribeIT® tab by using your own keywords and criteria (e.g. Cancel Rx or a patient's name).

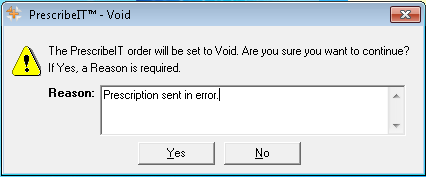
The Void button is available from the To Do and Sent tabs in the Message Manager. You can use the Void button to remove prescriptions sent in error from a prescriber or a rejected Dispense Notification.
When the Void button is selected for an applicable prescription, the PrescribeIT® - Void window opens, indicating that the order will be set to Void and to provide a reason for the void.
Voiding a Prescription from the To Do Tab
When voiding a prescription order from the To Do tab, the order will move to the Completed tab with a status of Void.
Voiding a Prescription from the Sent Tab
When a pharmacy's sent message is rejected and they are unsuccessful in their retry, they can void the prescription from the Sent tab. Once voided, the order's status will update to Void in the Sent tab.
Tip: Once voided, hovering over the transaction opens a tool tip that displays the reason that the transaction was voided.

The Refresh button is available from the To Do, Sent, and Completed tabs. Selecting the Refresh button simply refreshes based on activity completed (e.g. new orders received will refresh if the screen has not already been refreshed).
The Calendar and Calendar Browse buttons are available from the PrescribeIT® tab and visible from all tabs within (To Do, Sent, Completed).
Calendar

The Calendar button opens the Workbench calendar, which allows you to select a daily, weekly, or monthly view of the prescriptions within the PrescribeIT® tab. You can also select a specific date (either from the past or in the future) to view the prescriptions for that day/view.
Calendar Browse

The calendar button displays the PrescribeIT® tab for the current date. You can use the arrow buttons to view the PrescribeIT® tab for a different day.
Quick Filter
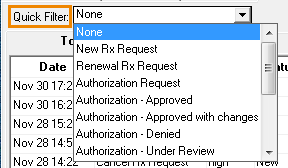
The Quick Filter is available from the PrescribeIT® tab and visible from all tabs within (To Do, Sent, Completed). Using the Quick Filter, you can filter by a transaction (Activity) type (e.g. New Rx Request). Once you select a transaction type to filter by, only the prescriptions associated with that type will display on screen.
Get Orders

The Get Orders button is available from the PrescribeIT® tab and visible from all tabs within (To Do, Sent, Completed). The Get Orders button retrieves messages from PrescribeIT® on demand and displays new orders.
Note: Messages are automatically pulled into the PrescribeIT® tab every five minutes. Click Troubleshooting PrescribeIT® Polling below if messages are not appearing in PrescribeIT® every five minutes or if you are receiving PrescribeIT® orders by fax rather than through the PrescribeIT® switch.
When a PrescribeIT® order is received by fax rather than through the PrescribeIT® switch, your PharmaClik Rx system may not be polling the PrescribeIT® switch every five minutes as expected. For polling to be successful, an application called PTS Service must be running.
If the PTS Service is running, the icon will be in the system tray.
To check if the PTS Service is running:
- Click the arrow on your task bar to open your system tray.

If the PTS Service icon is not visible, the service will need to be restarted.
To restart the PTS service:
There are two ways to restart the PTS Service:
Option 1: Restart your computer system, the PTS Service will also restart.
Option 2: In the McKesson PTS Utilities folder, double click the PTSWindowsServices shortcut. The service will restart.

Process

The Process button is available from the PrescribeIT® tab within the To Do tab. When you select a prescription and select the Process button, this will open the prescription in the New Prescription window where you can begin prescription filling process. To learn more, see Processing a New Rx Request.