Adding or Removing a Drug's Default Auxiliary Labels
You can select default auxiliary labels for a drug. When you create a prescription, you can use the default labels or you can select different labels.
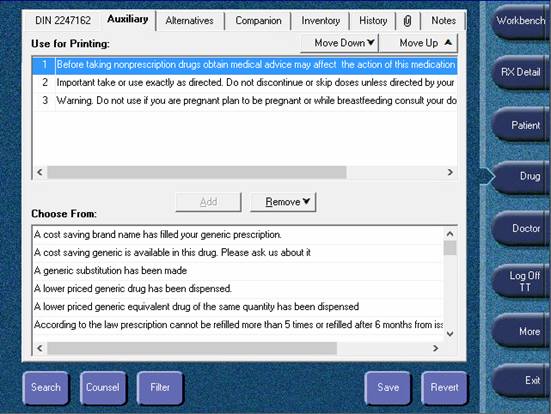
The Use for Printing list shows the default auxiliary labels that have been selected for the drug. The Choose From list shows the auxiliary labels you can choose from.
Adding a Default Auxiliary Label
To add a default auxiliary labels:
- Open the Drug Folder.
- Press the Auxiliary tab.
- Under Choose From, highlight an auxiliary label to select it.
Note: To choose multiple auxiliary labels, hold down the CTRL key on the keyboard when you are highlighting the auxiliary labels.
- Press the Add button. The auxiliary label is moved to the Use for Printing list.
- Repeat steps 3-4 to add additional auxiliary labels, up to a maximum of 5 (the label set can only print a maximum of 5 auxiliary labels).
- Press the Save button.
Changing the Priority
To change the priority of the default auxiliary labels:
- Open the Drug Folder.
- Press the Auxiliary tab.
- Under Use for Printing, highlight an auxiliary label to select it.
- Press the Move Down or Move Up button to change the priority.
- Press the Save button.
Note: If the drug is an opioid, the opioid auxiliary label is set to print in position 1. This cannot be altered.
Removing a Default Auxiliary Label
- Open the Drug Folder.
- Press the Auxiliary tab.
- Under Use for Printing, highlight an auxiliary label to select it.
- Press the Remove button. The auxiliary label is moved to the Choose From list.
- Press the Save button.
For more information regarding mixtures, see Adding or Removing a Mixture's Default Auxiliary Labels.